
Chocolate Dipped Spiderweb Halloween Cookies
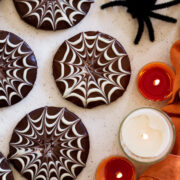
Mesmerizing Spiderweb Halloween Cookies – Chocolate shortbread cookies are dipped in dark chocolate and drizzled in white chocolate to create a wavy and intricate, festive spiderweb design. They are as delicious as they are pretty!

Chocolate Halloween Cookies
Meet the tastiest, buttery and decadently chocolaty cookies you’ll never be able to get enough of! They have a melt-in your-mouth tender texture and such an enticingly rich flavor.
They are actually a breeze to make (you just need a piping bag and a toothpick to create the web) and they’re always sure to impress with their detailed, high contrast design. You can give them as gifts, serve them at a Halloween party or just make them for a fun baking project to treat yourself this weekend.
If you’d like you can also make these in advance and freeze them (shortbread is a perfectly freezer friendly cookie). You can freeze the dough or baked and prepared cookies.
Just be warned you most likely can’t stop at one cookie. They are 100% irresistible and new favorite Halloween treat!

Chocolate Halloween Cookie Recipe Ingredients
Here are the ingredients you’ll need to make them. Scroll below for the full recipe with amounts and print option.
- All-purpose flour
- Dutch process cocoa powder
- Salt
- Unsalted butter
- Powdered sugar
- Vanilla extract
- Bittersweet
- White chocolate


How to Make Spiderweb Halloween Cookies Dough
- In a mixing bowl whisk flour, cocoa powder and salt.
- In the bowl of an electric stand mixer fitted with the paddle attachment cream together butter and sugar until well blended.
- Mix in vanilla extract.
- Add flour mixture then mix until combined.
- Divide dough into two equal portions. Roll each into a 4-inch log (smooth and turn to flatten the ends as you roll). Wrap in plastic wrap or parchment paper and chill 2 hours, or until firm.
- Preheat oven to 350 degrees. Line 2 baking sheets with parchment paper.
- Remove one dough log from fridge. Slice into 1/4-inch thick slices (you should get 15 slices).
- Transfer to one of the baking sheets, spacing 1 1/2-inches apart, and bake in preheated oven until set, about 10 to 13 minutes.
- Remove and let cool on baking sheet 5 minutes, then transfer to a wire rack to cool completely. Leave parchment paper on baking sheet for later.
- Repeat slicing and baking process with remaining dough log from fridge.
 How to Create the Design with Chocolate
 How to Create the Design with Chocolate
- Divide chocolate evenly among two small mixing bowls. Melt one batch in the microwave on 50% power in 30 second increments, stirring between intervals, until melted and smooth.
- Place white chocolate in a third mixing bowl. Melt in microwave in 30 second increments, stirring between each, until melted and smooth. Transfer white chocolate to a piping bag with a small #4 round tip.
- Dip cookies in chocolate (I work with about 4 cookies at a time to decorate so it doesn’t set before finishing the web decoration), turn and let excess chocolate run back into bowl then transfer back to baking sheets that are lined with the parchment paper.
- Then right away do a dot in the center of the cookie with the white chocolate, followed by a piping of 3 rings around it all spaced evenly apart (refer to photos for a guide). Using a toothpick pull from dot at center to edge, repeat to create a web pattern (pulling to about 1/2-inch increments at edge).
- Repeat this process with all of the cookies, and melting the second batch of chocolate.
- Let chocolate set at room temperature or in the fridge to speed it up.

Helpful Tips
- I recommend working with and only melting half of the dark chocolate at a time so it doesn’t start to cool and harden before you are done dipping. Unless you have a second person helping and are able to move quickly.
- Note that the chocolate may bloom with streaks or spots since it’s not tempered here. You can use the temper method if preferred but I think the little flecks actually just add to the theme here.
- If you find the white chocolate firming up in the bag you can run under warm water (be careful not to get any in the bag, cover the tip, and dry the exterior of the bag before continuing). Or use a blow dryer on warm heat.
- Once you are getting near the end of the dark chocolate, if you find it easier, you can spread the melted chocolate over the cookies with an offset spatula rather than dipping.
Possible Substitutes
- Regular cocoa powder will work here as well.
- Semi-sweet chocolate or even milk chocolate should work for dipping as well if you want a sweeter, milder flavor.
- Salted butter can be used if that’s what you have on hand, just omit all salt from the recipe.

How to Store the Cookies
- These cookies will keep in an airtight container at room temperature up to 1 week.
- Or store in the fridge up to 2 weeks or in the freezer up to 3 months.
- Use parchment paper between layers of cookies when storing so they don’t smudge.
- Unbaked dough logs can be frozen up to 3 months. Thaw in fridge overnight before slicing and baking as directed.

More Tasty Halloween Treats to Try
Spiderweb Halloween Cookies
Chocolate shortbread cookies are dipped in dark chocolate and drizzled in white chocolate to create a wavy and intricate, festive spiderweb design. They are as delicious as they are pretty!
Servings: 30 cookies
- 1 3/4 cups (248g) all-purpose flour (scoop and level to measure)
- 6 Tbsp (38g) Dutch process cocoa powder
- 1/4 tsp (heaping) salt
- 1 cup (226g) unsalted butter, about halfway softened to room temp (should still be fairly firm)
- 1 1/4 cups (150g) powdered sugar
- 2 tsp vanilla extract
- 10 oz bittersweet chocolate, chopped, divided
- 3 oz white chocolate, chopped
-
In a mixing bowl whisk together flour, cocoa powder and salt. Set aside.
-
In the bowl of an electric stand mixer fitted with the paddle attachment cream together butter and powdered sugar until well blended.
-
Mix in vanilla extract.
-
Add flour mixture then mix until combined.
-
Divide dough into two equal portions. Roll each into a 4-inch log (smooth and turn to flatten the ends as you roll). Wrap in plastic wrap or parchment paper and chill 2 hours, or until very firm.
-
Preheat oven to 350 degrees. Line two baking sheets with parchment paper.
-
Remove one dough log from fridge. Slice into 1/4-inch thick slices (you should get 15 slices).
-
Transfer to one of the baking sheets, spacing 1 1/2-inches apart and bake in preheated oven until set, about 10 to 13 minutes.
-
Remove and let cool on baking sheet 5 minutes, then transfer to a wire rack to cool completely. Leave parchment paper on baking sheet for later.
-
Repeat slicing and baking process with remaining dough log from fridge.
-
Divide chocolate evenly among two small mixing bowls. Melt one batch in the microwave on 50% power in 30 second increments, stirring between intervals, until melted and smooth.
-
Place white chocolate in a third mixing bowl. Melt in microwave in 30 second increments, stirring between each, until melted and smooth. Transfer white chocolate to a piping bag with a small #4 round tip.
-
Dip cookies in chocolate (I work with about 4 cookies at a time to decorate so it doesn’t set before finishing the web decoration), turn and let excess chocolate run back into bowl then transfer back to baking sheets that are lined with the parchment paper (dipped side facing upright).
-
Then right away do a dot in the center of the cookie with the white chocolate, followed by a piping of 3 rings around it all spaced evenly apart (refer to photos for a guide). Using a toothpick pull from dot at center to edge, repeat to create a web pattern (pulling to about 1/2-inch increments at edge).
-
Repeat this process with all of the cookies, and melting the second batch of chocolate. If the white chocolate hardens cover the tip with your fingertip and run under warm water facing it downward (dry bag exterior with paper towel so it doesn’t drip on cookies).
-
Let chocolate set at room temperature or in the fridge to speed it up.
-
Store cookies in an airtight container.
Nutrition Facts
Spiderweb Halloween Cookies
Amount Per Serving
Calories 177
Calories from Fat 99
% Daily Value*
Fat 11g17%
Saturated Fat 7g44%
Trans Fat 0.3g
Polyunsaturated Fat 0.4g
Monounsaturated Fat 3g
Cholesterol 17mg6%
Sodium 21mg1%
Potassium 92mg3%
Carbohydrates 19g6%
Fiber 1g4%
Sugar 10g11%
Protein 2g4%
Vitamin A 194IU4%
Vitamin C 0.01mg0%
Calcium 16mg2%
Iron 1mg6%
* Percent Daily Values are based on a 2000 calorie diet.


